Route Templates
Route Templates in Kinesis API allow you to define reusable, parameterized route blueprints that can be quickly applied when creating new routes. Instead of rebuilding the same flow logic from scratch for each route, you create a template once and supply variable values at apply-time to generate fully configured routes.
Understanding Route Templates
Each route template encapsulates a complete route definition:
- Name: A unique identifier for the template (e.g.,
fetch_collection_by_id) - Description: A human-readable explanation of what the template does
- HTTP Method: The method the resulting route will use (GET, POST, PUT, PATCH, DELETE, etc.)
- Authentication Settings: Optional JWT authentication configuration, pre-configured in the template
- URL Parameters: Parameter definitions that the resulting route will accept
- Body Structure: Expected request body fields for the resulting route
- Flow: A complete X Engine flow that defines the route’s logic, with
{variable_key}placeholders in any string field - Variables: Declarations of each
{variable_key}placeholder, with a description and optional default value
Route templates can be scoped to a specific project or kept in the global scope (no project), making them available to all projects.
Understanding Template Variables
The most powerful feature of route templates is the ability to parameterize any string field in the flow using {variable_key} placeholders. When a template is applied to create a new route, the user fills in the value for each variable and the system performs a find-and-replace across every matching string field in the entire flow.
Where Variables Can Be Used
Variables can be placed in any string-type field across the route configuration and all block types, for example:
- Route ID and Route Path of the resulting route
- JWT authentication — the payload field (
field) and reference collection (ref_col) in the auth block - Body field keys and URL parameter keys (and the parameter delimiter)
local_nameandref_colin a FETCH block:{collection_name},{result_var}templatestring in a TEMPLATE blockkeyin a VAULT blockref_colandref_objectin a CREATE blockref_col,ref_property, and target fields in UPDATE / SIMPLE_UPDATE blocks- Literal operand
datavalues inside conditions, operations, filters, and loop bounds - Pair keys and literal pair values in OBJECT and RETURN blocks
- The
messagefield of a CONDITION block’s fail response - Email template name, recipients, and variable values in an EMAIL block
Variable Declaration
For each placeholder used in the flow, a corresponding variable declaration should be added to the template. Each variable has:
- Key: The placeholder name used in the flow (without braces), e.g.,
collection_name - Description: An explanation that guides the user when filling in the value (e.g., “The name of the collection to fetch data from”)
- Default Value: An optional pre-filled value shown when the template is applied
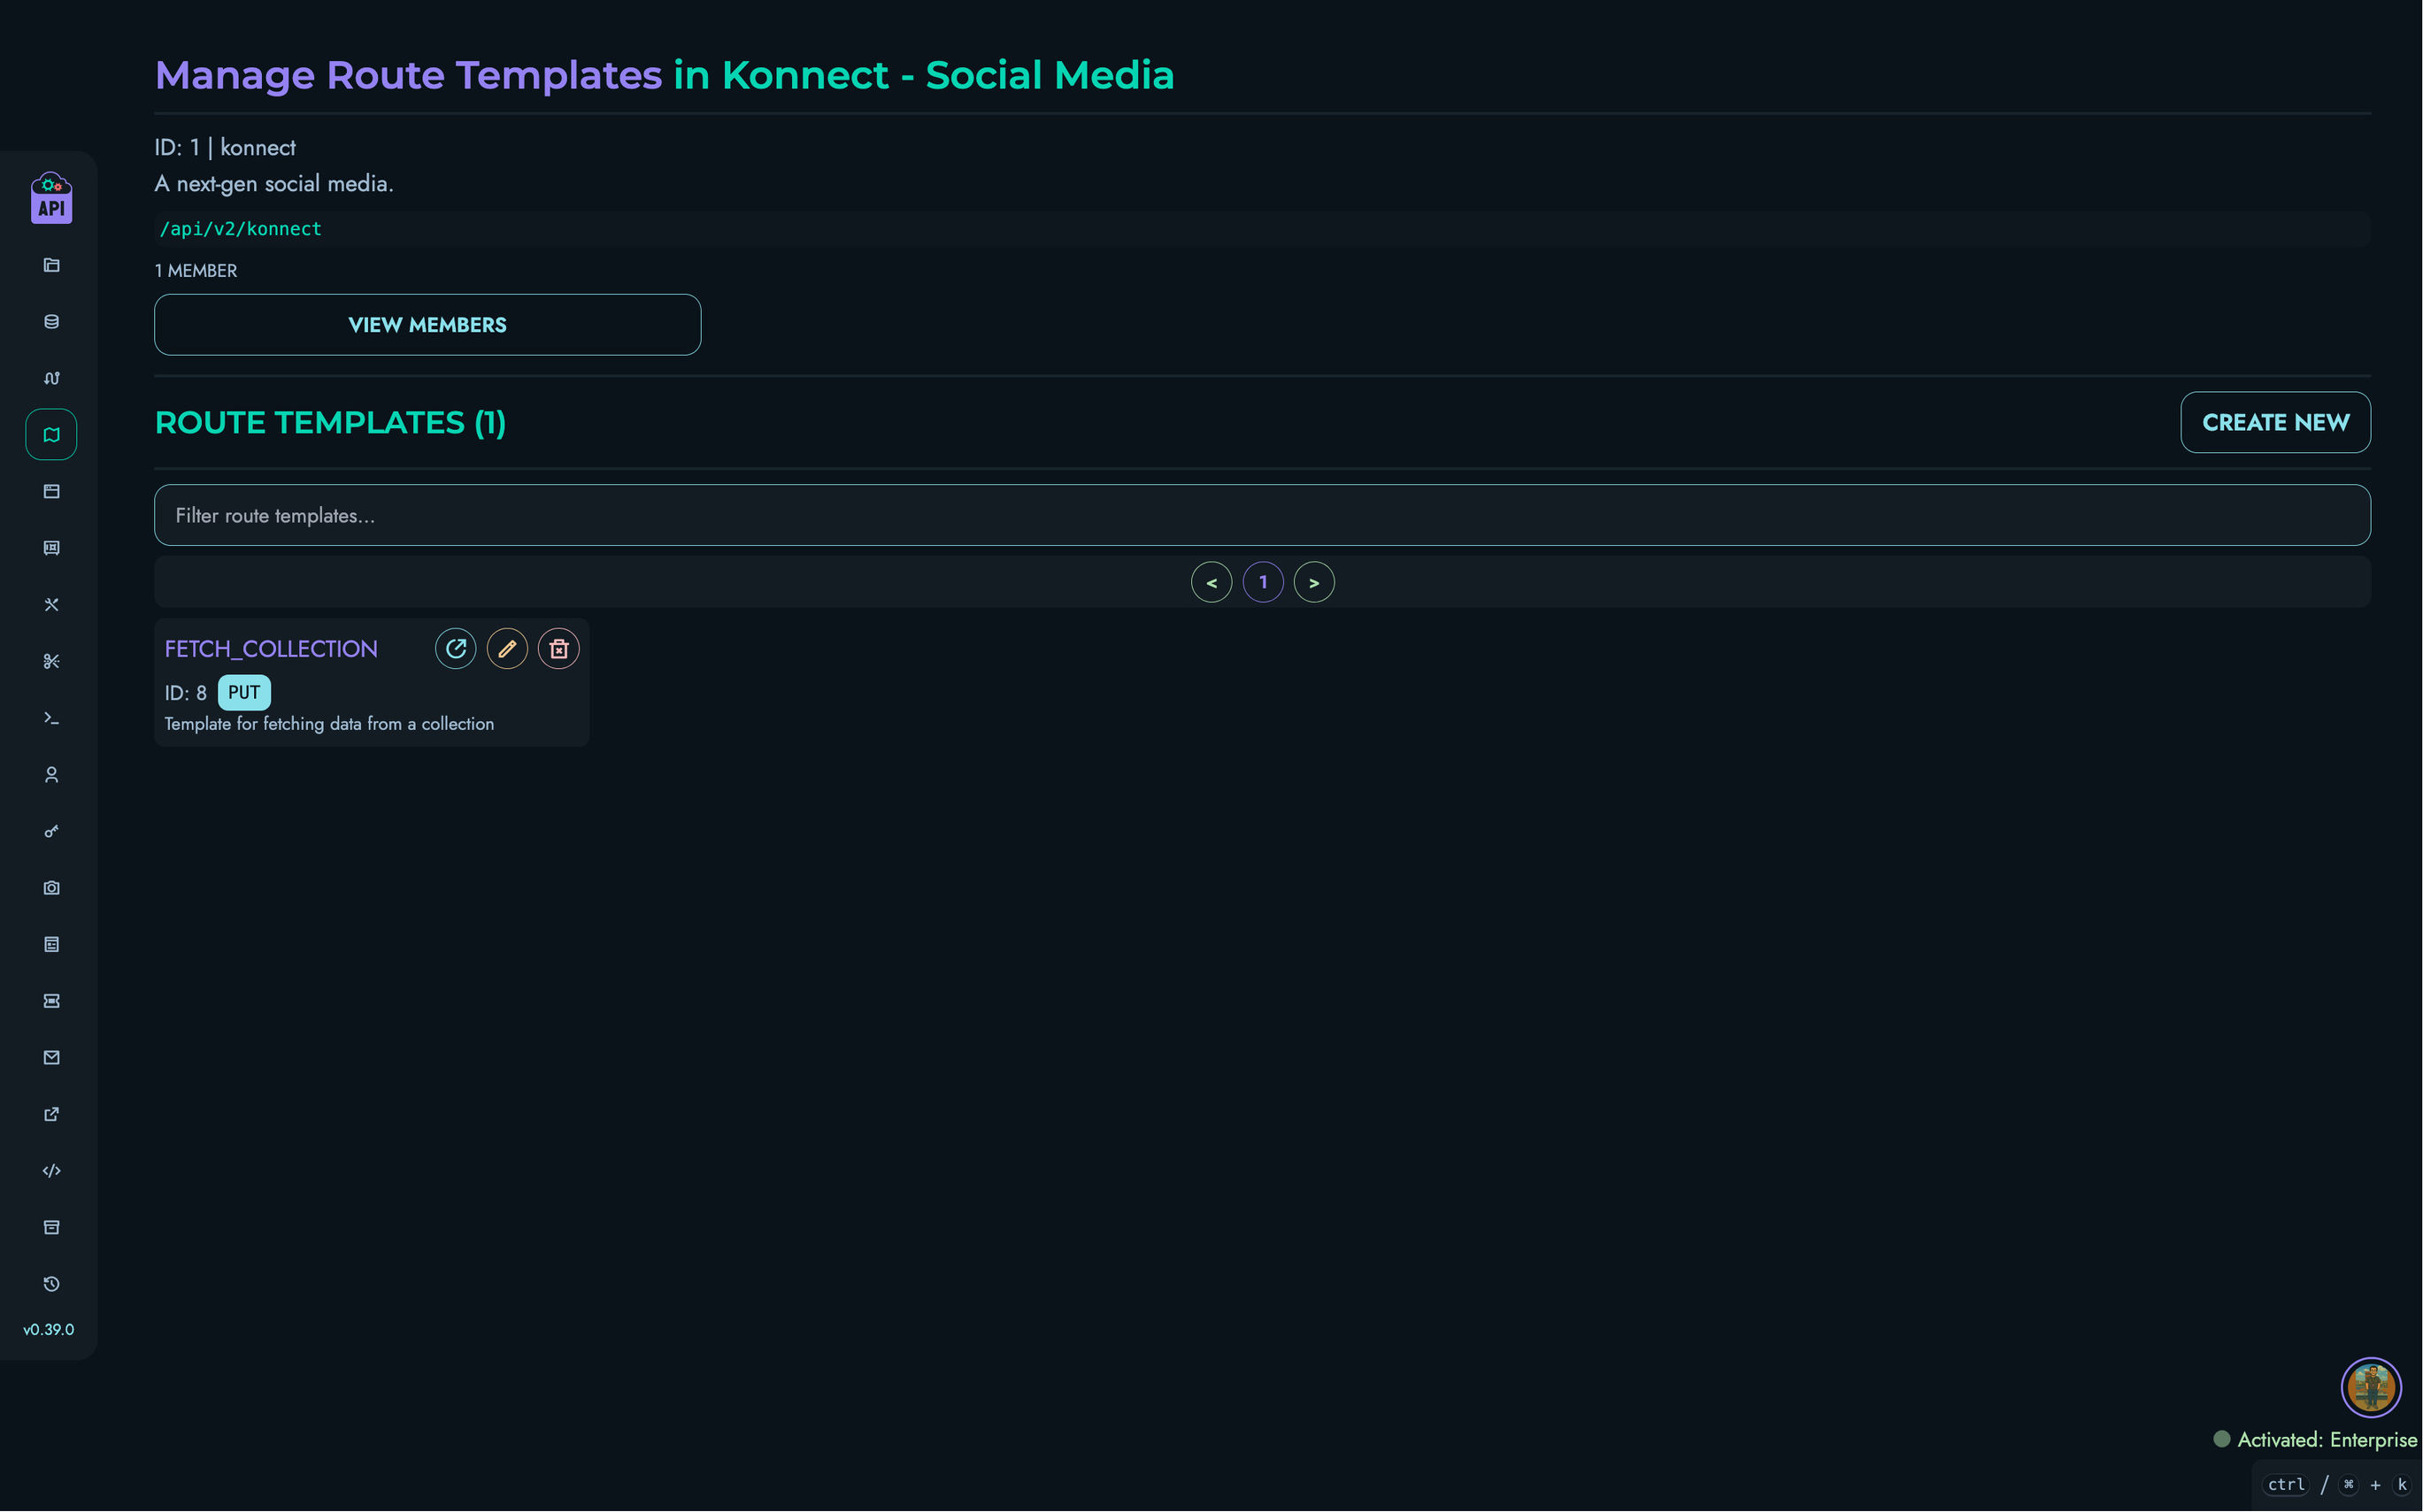
Accessing Route Templates
Navigate to /web/routes/templates to manage templates in the global scope, or /web/routes/templates?id=project_id for project-scoped templates.
The interface shows:
- A filterable, paginated list of route templates
- Template cards with name, description, and HTTP method badge
- Action buttons for viewing, editing, and deleting templates
- A “Create New” button for users with sufficient permissions
Creating a Route Template
Users with ROOT, ADMIN, or AUTHOR roles can create route templates:
- Navigate to the Route Templates page
- Click the “Create New” button
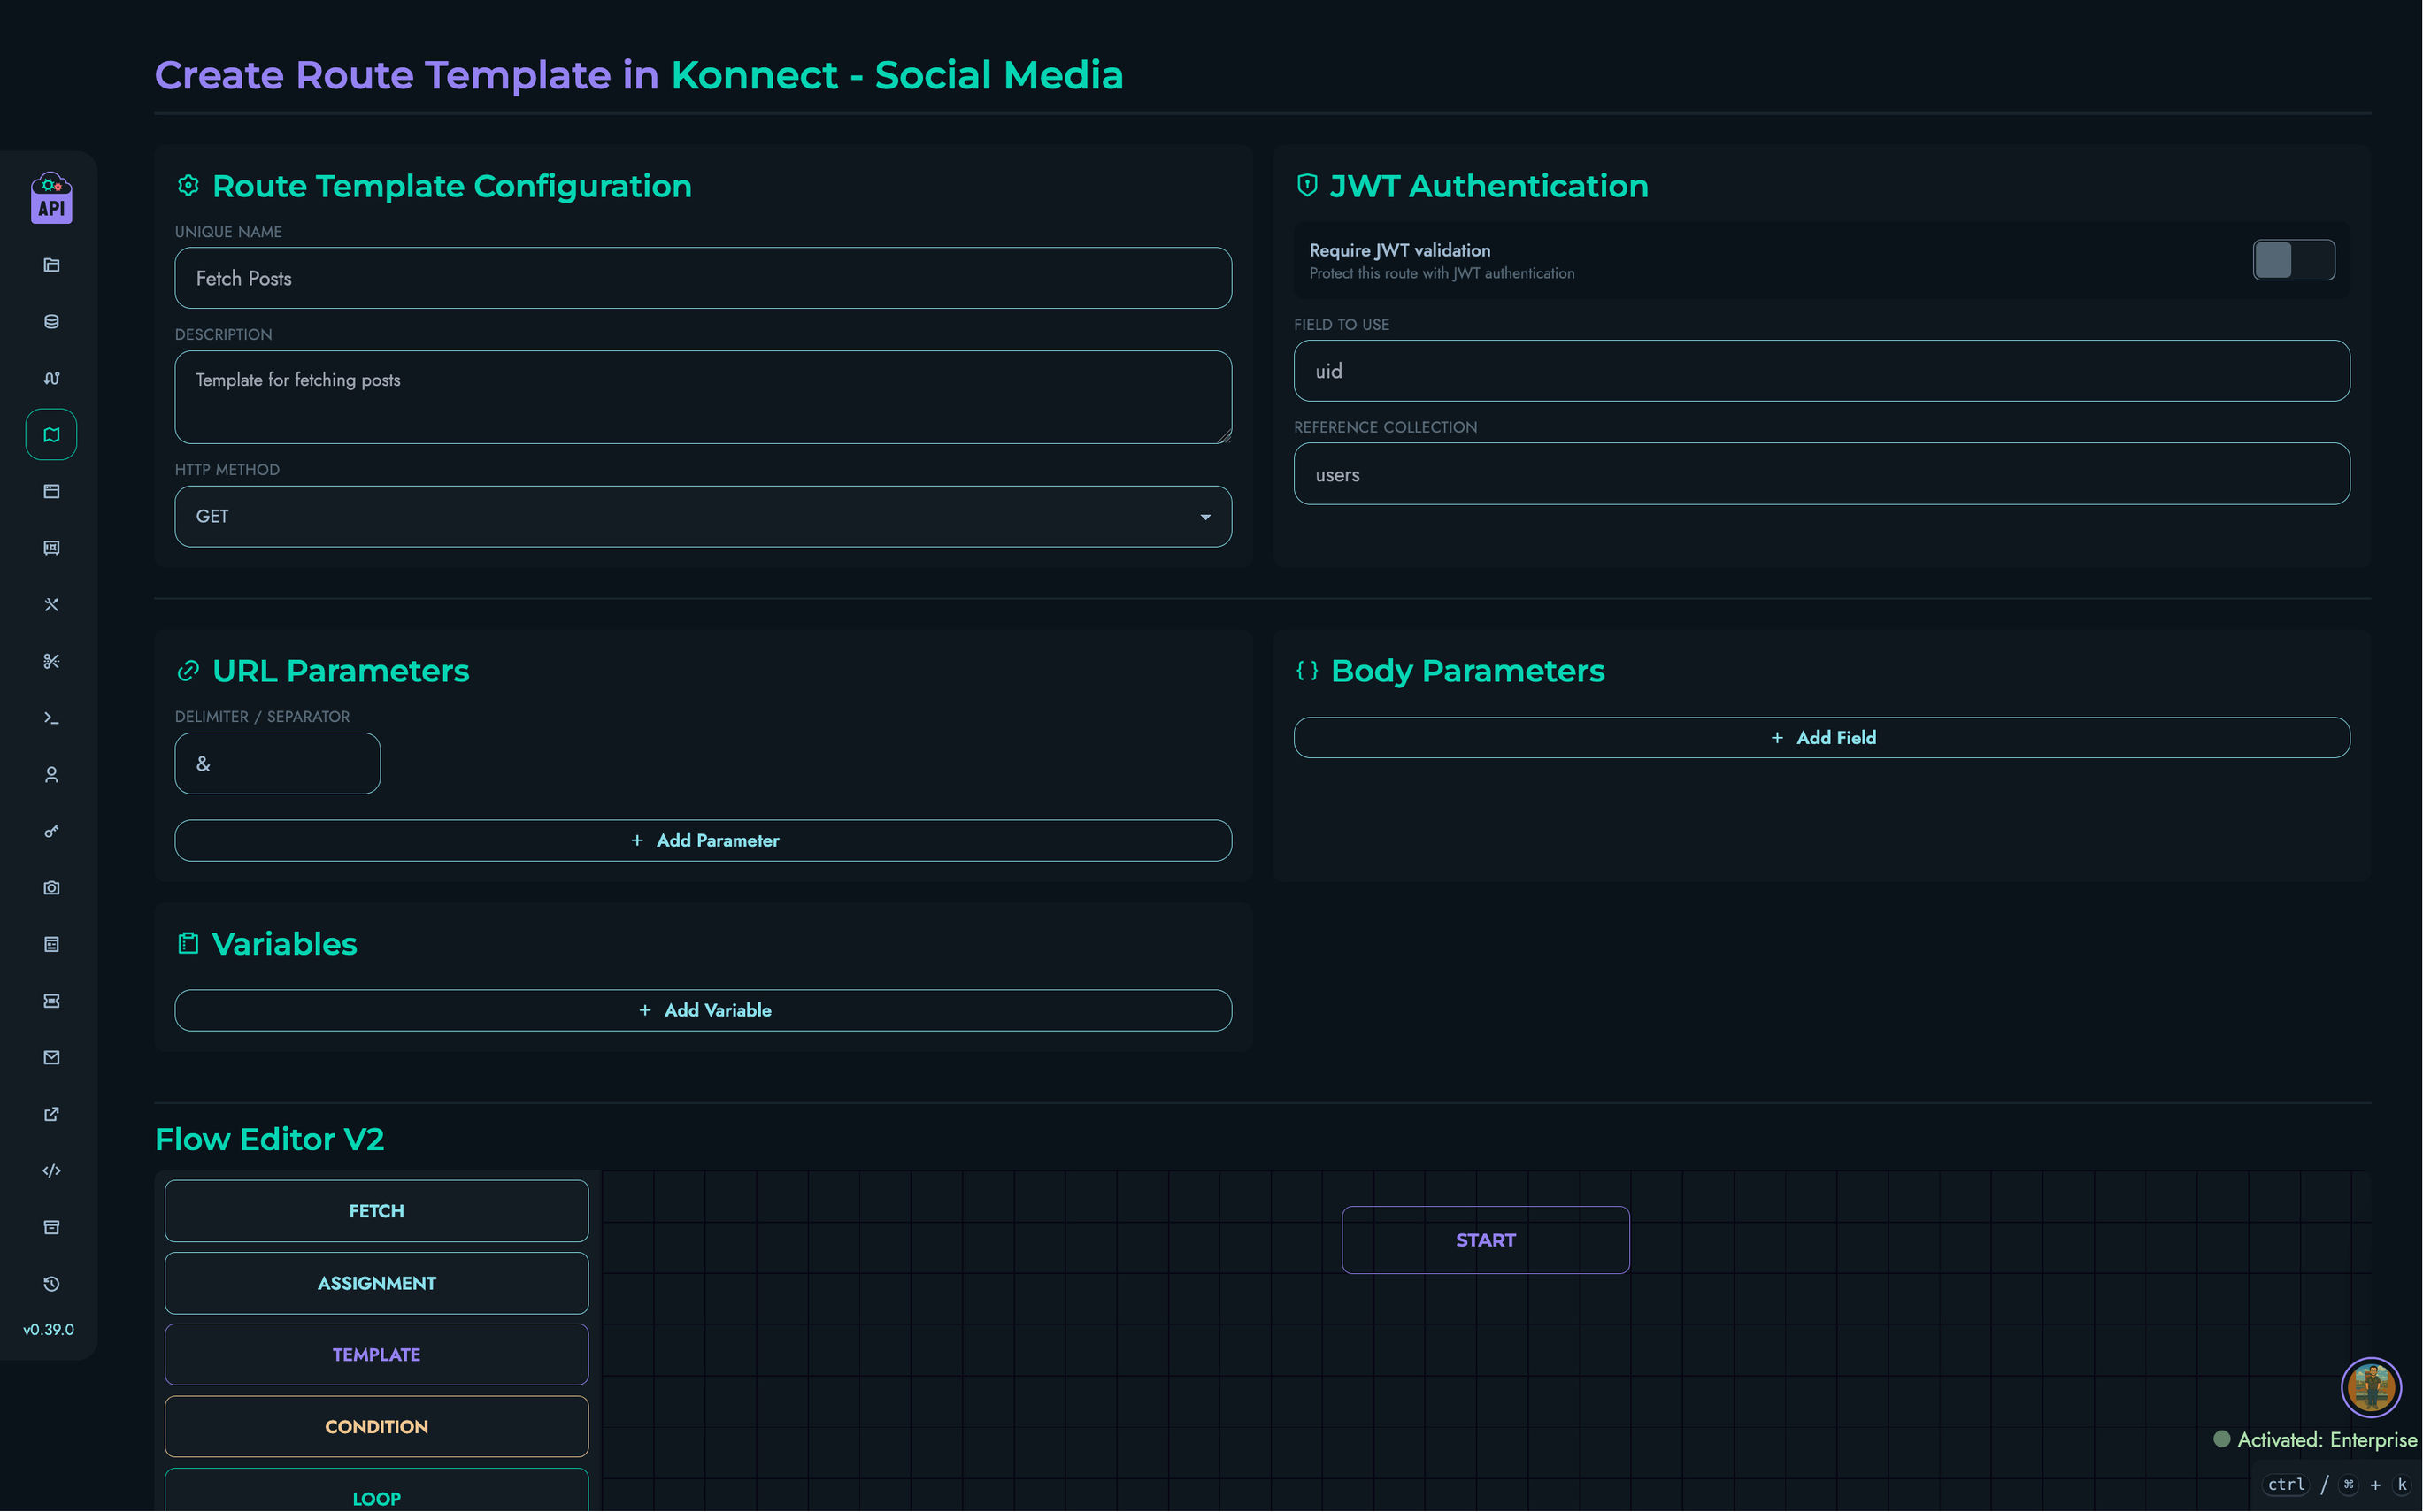
- You will be taken to the creation page at
/web/routes/templates/create
Template Configuration
The creation page is divided into several sections:
Route Template Configuration
- Unique Name: A unique identifier for the template (e.g.,
auth_fetch_user_by_id) - Description: A clear explanation of what the template provides (e.g., “JWT-authenticated route that fetches a single record from a collection by ID”)
- HTTP Method: The HTTP method the resulting route will use
JWT Authentication
Pre-configure JWT authentication settings that will be applied when the template is used:
- Require JWT validation: Toggle to enable JWT protection for routes created from this template
- Field to use: The JWT payload field extracted for authentication (e.g.,
uid) - Reference Collection: The collection used to validate the extracted field (e.g.,
users)
URL Parameters
Define the URL parameter structure expected by the resulting route:
- Delimiter / Separator: The character separating query parameters (default:
&) - Parameter Definitions: Each parameter’s name and expected data type
Body Parameters
For POST, PUT, and PATCH templates, define the expected request body structure. Each body field has a name and a data type.
Variables
Declare all {variable_key} placeholders used in the flow. For each variable:
- Key: The placeholder identifier (must match exactly what appears in
{...}in the flow) - Description: Guidance text shown to the user when applying the template
- Default Value: An optional value pre-filled when the template is applied
It is good practice to add a variable declaration for every placeholder in the flow, even if a default value makes it optional to change.
Flow Editor
Build the route logic using the same X Engine Flow Editor available for regular routes. Use {variable_key} syntax anywhere you want the value to be substituted at apply-time.
Example — FETCH block with variables:
| Field | Value |
|---|---|
| Local Name | {result_var} |
| Reference Collection | {collection_name} |
When a user applies this template and sets result_var = "post" and collection_name = "posts", the resulting FETCH block will have local_name: "post" and ref_col: "posts".
Saving the Template
Click the “Create” button to save the template. The system validates all required fields and stores the template with its full flow and variable declarations.
Viewing a Route Template
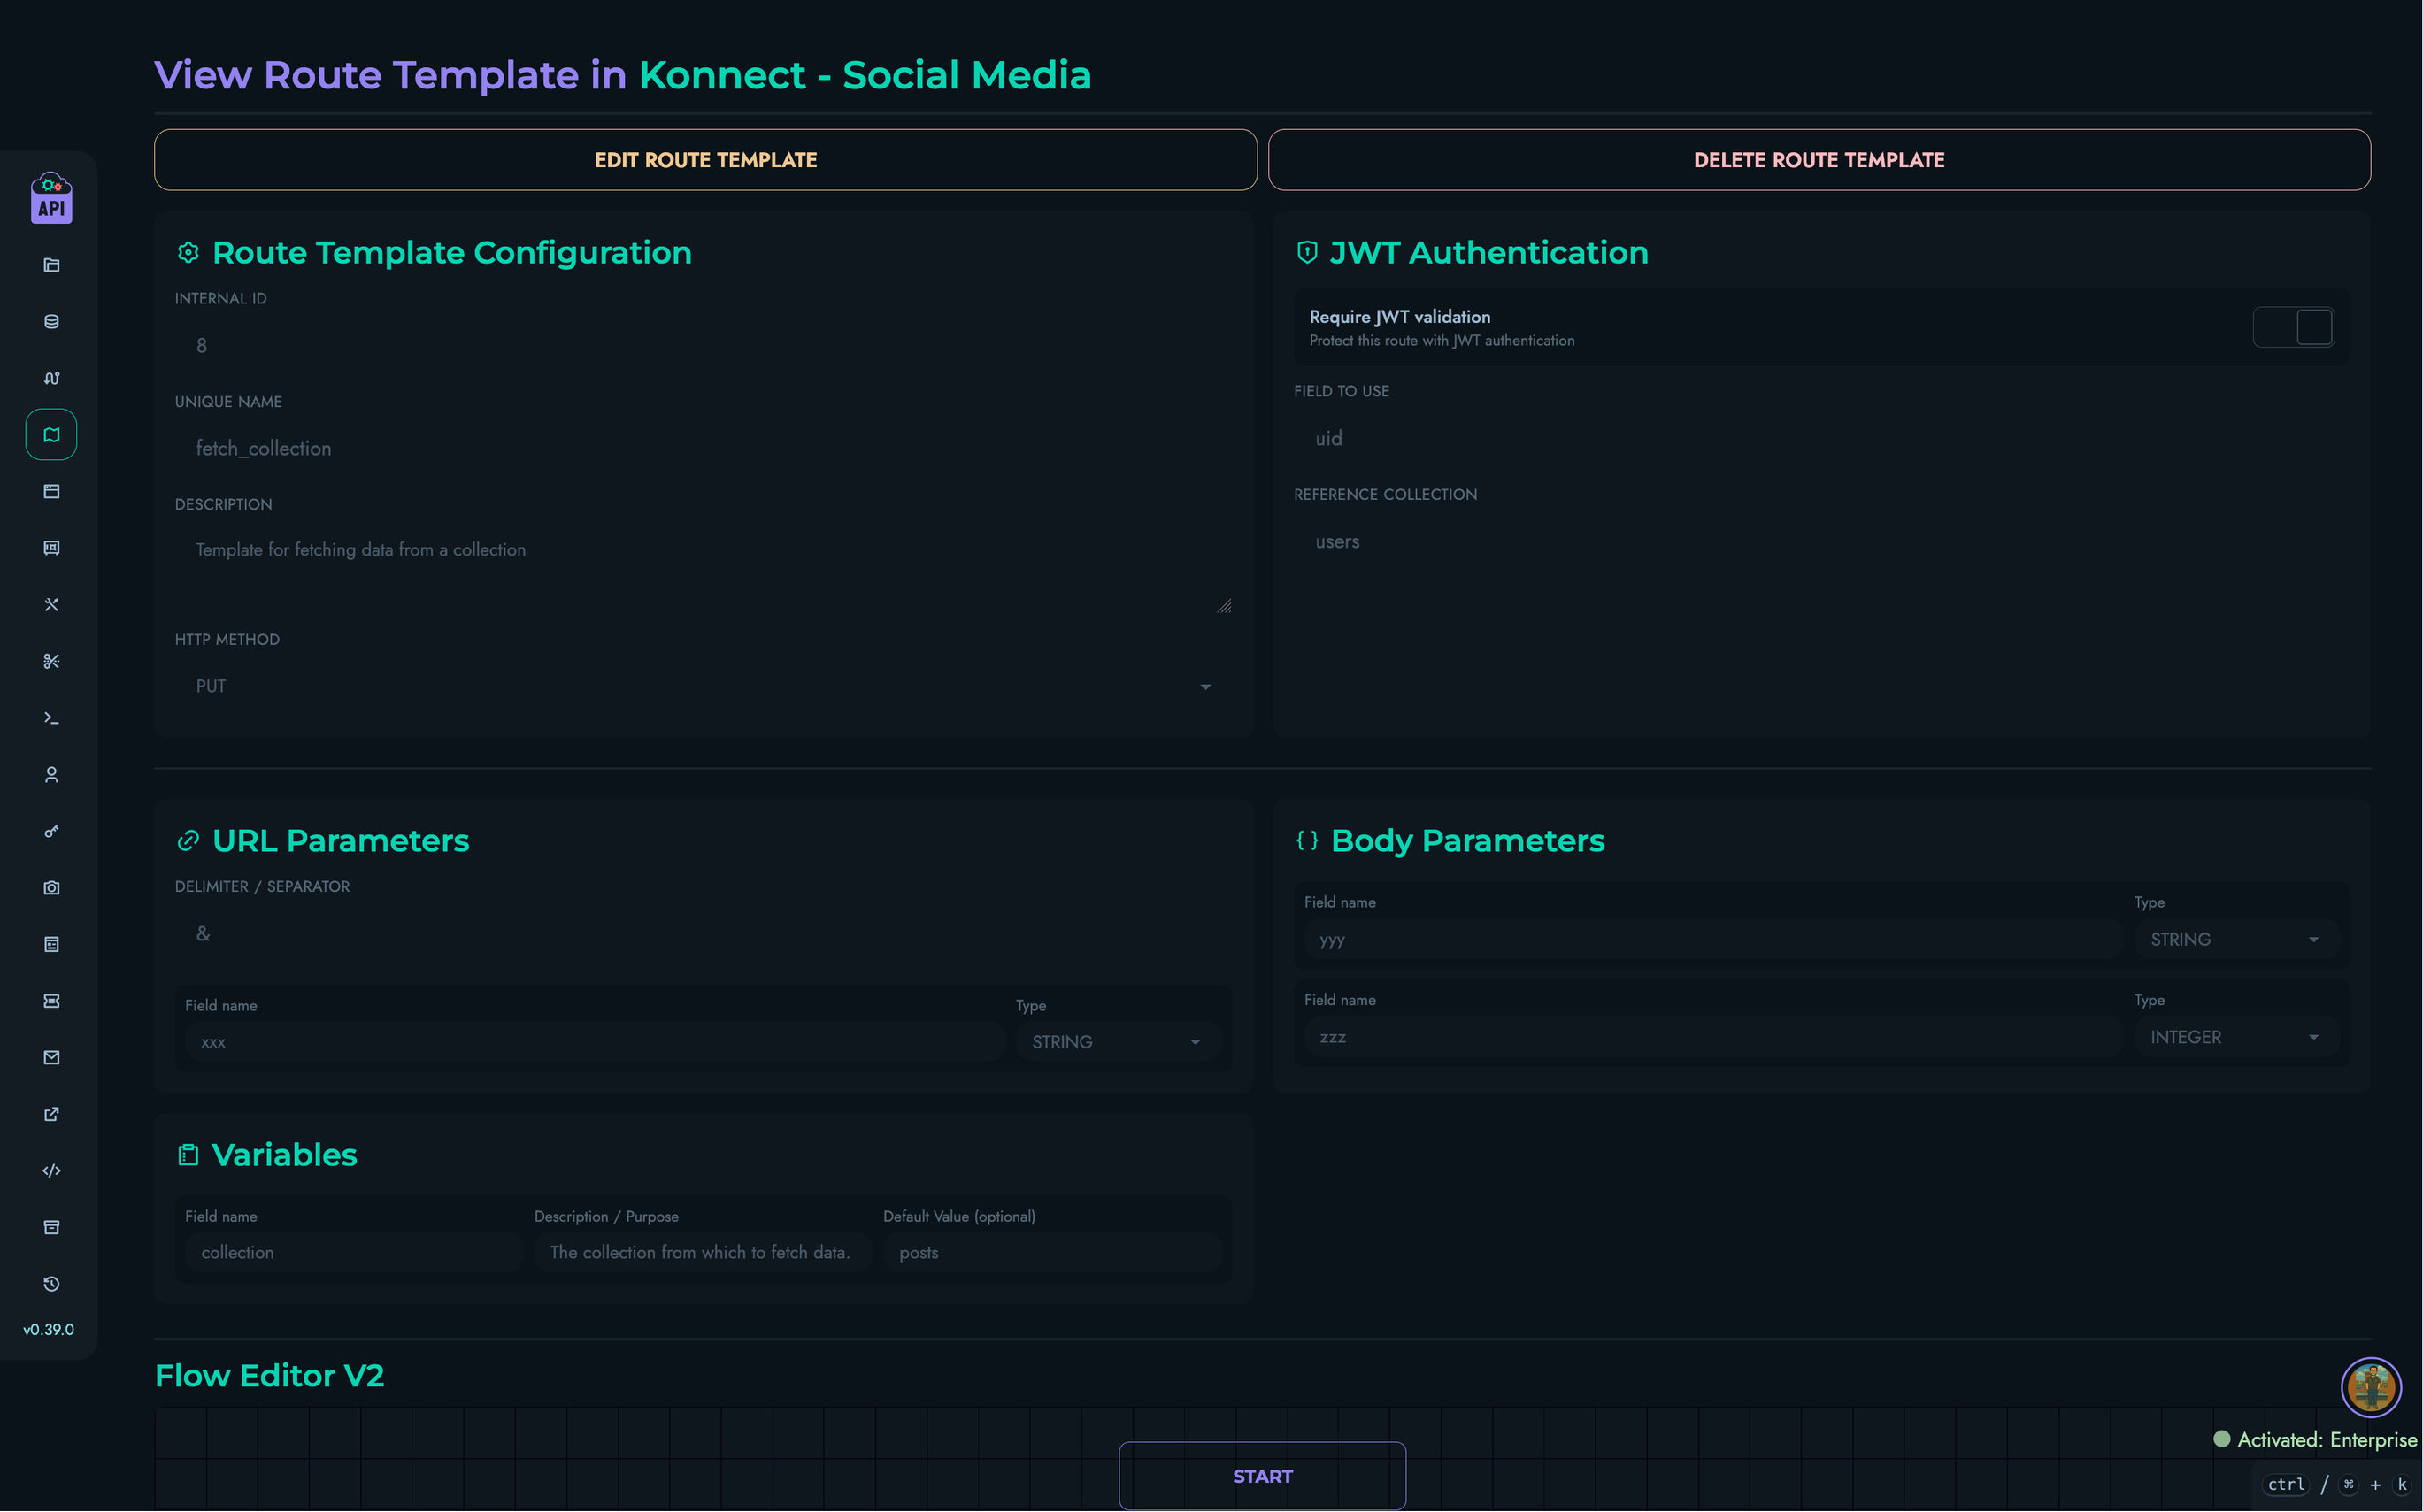
To view the details of a route template:
- Click the “View” button (eye icon) on a template card, or navigate to
/web/routes/templates/view?id=[template_id] - The view page shows all template information in read-only mode:
- Configuration (name, description, method)
- JWT authentication settings
- URL parameter definitions
- Body parameter definitions
- Variable declarations with keys, descriptions, and defaults
- The complete flow in a read-only version of the Flow Editor
From the view page, authorized users can navigate directly to the Edit page.
Editing a Route Template
Users with ROOT, ADMIN, or AUTHOR roles can edit existing route templates:
- Click the “Edit” button (pencil icon) on a template card, or use the “Edit Route Template” button on the view page
- You will be taken to the edit page at
/web/routes/templates/edit?id=[template_id] - Modify any aspect of the template: configuration, authentication, parameters, variables, or flow
- Click “Update” to save your changes
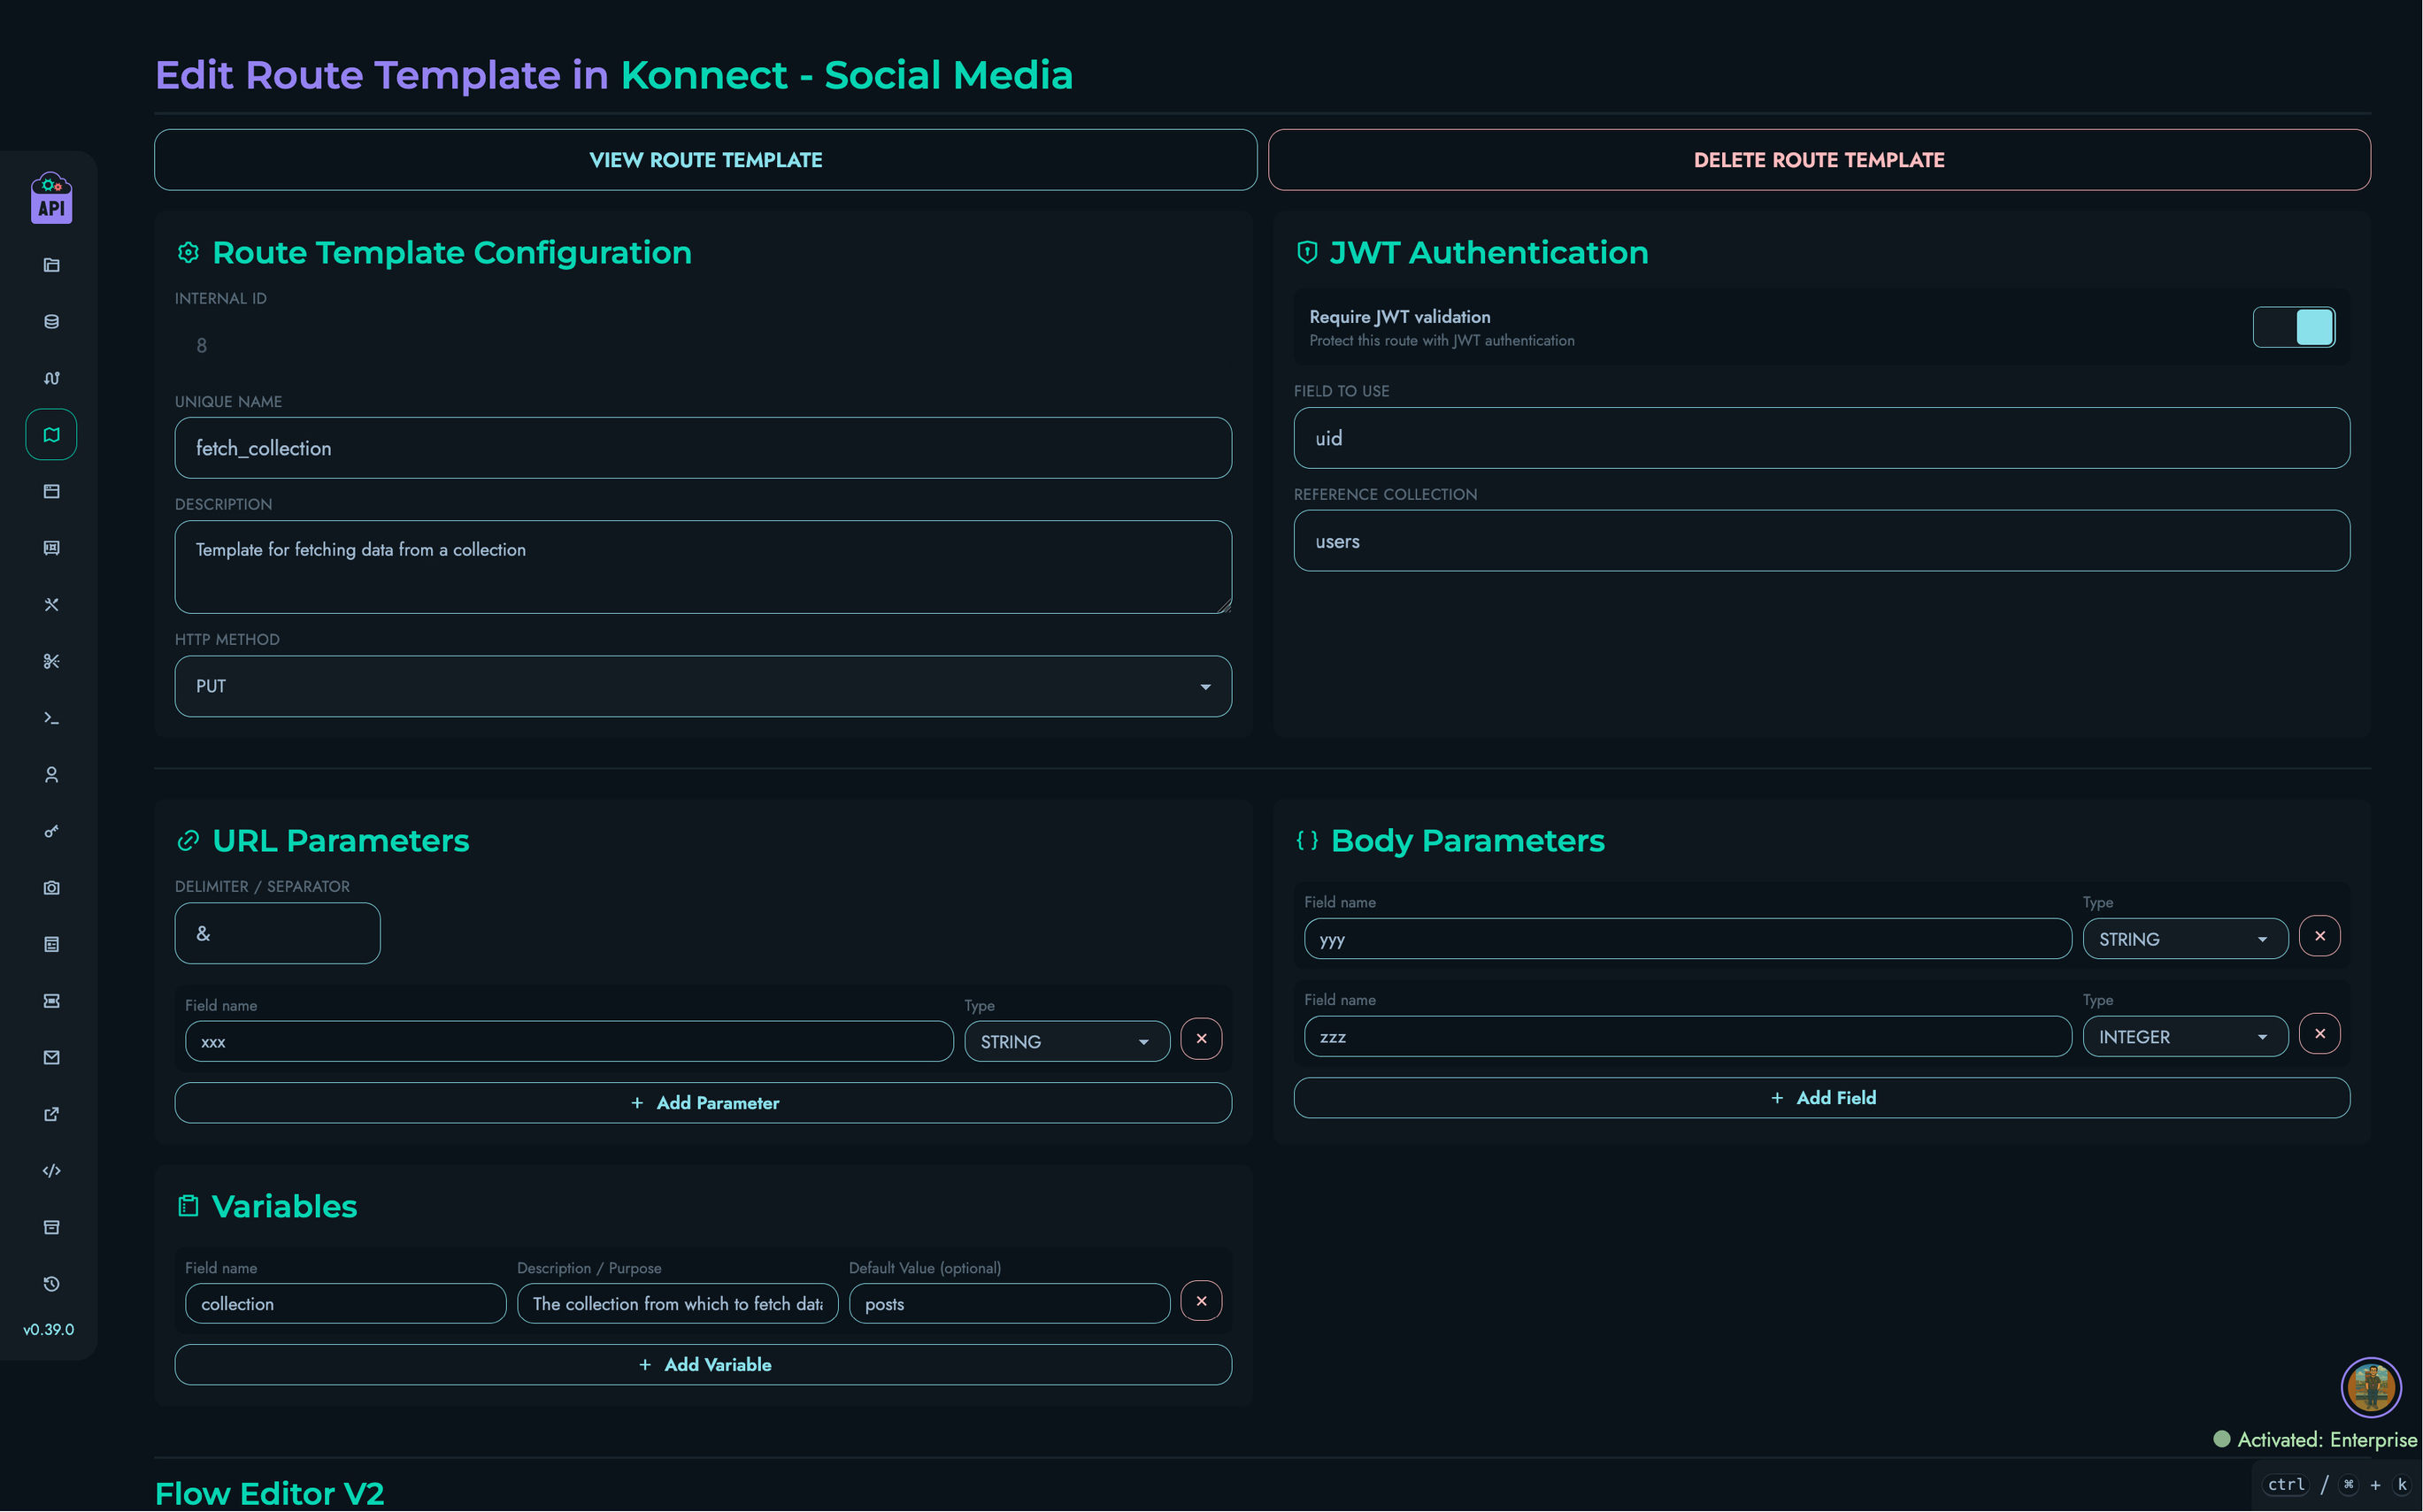
Note: Editing a template does not automatically update routes that were previously created from it. Each application of a template is a one-time snapshot.
Deleting a Route Template
Users with ROOT, ADMIN, or AUTHOR roles can delete route templates:
- From the templates list, locate the template to remove
- Use the “Delete” button on the template card or the “Delete Route Template” button on the edit page
- Confirm the deletion in the modal that appears
⚠️ Warning: Deleting a route template permanently removes it. Any routes already created from it are unaffected, but the template will no longer be available for future use.
Applying a Route Template
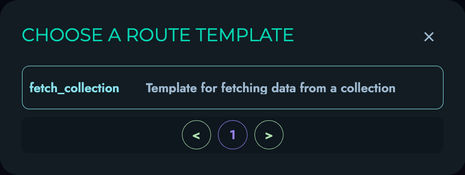
Route templates are applied when creating a new route within a project. The apply workflow:
- From the route creation page (
/web/routes/create?id=project_id), click “Create from Template” - A modal appears listing all available route templates filtered for the current project
- Browse and select the template you want to use
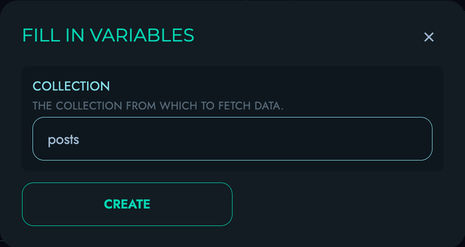
- If the template has variables, a second modal appears listing each variable with:
- The variable key
- A description of what value to provide
- An input pre-filled with the default value (if set)
- Fill in values for all variables
- Click “Apply Template” to populate the route creation form with the template’s configuration and substituted flow
After applying, you can review and further customize the populated form before clicking “Create” to finalize the route.
Variable Substitution
When the template is applied, the system replaces every {variable_key} occurrence in all applicable string fields throughout the entire flow with the value you provided. This substitution covers:
- Route ID and Route Path of the resulting route
- JWT authentication — the payload field name and reference collection
- Body field keys and URL parameter keys (and the parameter delimiter)
- All block name and collection reference fields
- Template strings and literal operand values inside conditions and operations
- Filter operands, loop bounds, and step values
- Object pair keys and values
- Vault key references
- Conditional fail messages
- Email template names, recipient addresses, and variable pairs
Substitution only modifies literal (non-variable-reference) string fields — fields that reference other runtime variables (using the ref_var flag) are left unchanged.
Project Scope vs. Global Scope
Route templates can be either project-scoped or global:
| Scope | Description | Access |
|---|---|---|
| Global | No project assigned; available across all projects | All users |
| Project | Assigned to a specific project | Project members only |
When browsing templates for a project, the interface shows both templates assigned to that project and all unassigned global templates, giving you the full set of templates relevant to that project.
User Permissions
Access to route template management is role-based:
| Role | View Templates | Create Templates | Edit Templates | Delete Templates |
|---|---|---|---|---|
| ROOT | ✓ | ✓ | ✓ | ✓ |
| ADMIN | ✓ | ✓ | ✓ | ✓ |
| AUTHOR | ✓ | ✓ | ✓ | ✓ |
| VIEWER | ✓ | ✗ | ✗ | ✗ |
Additionally, users can only access project-scoped templates from within projects they are members of.
API Endpoints
Route template operations can also be performed via the API:
- Create / Update:
POST /route/template/create— Create a new template or update an existing one - Fetch All:
GET /route/template/fetch— Retrieve all route templates (optionally filtered by project) - Fetch One:
GET /route/template/fetch/one— Retrieve a specific route template by ID or name - Delete:
DELETE /route/template/delete— Delete a route template
All route template API endpoints require:
- Valid authentication (the authenticated user’s
uid) - Appropriate user role (AUTHOR or above for write operations)